Friday, 26 August 2011

Summer comforts

Last time I checked it was meant to be august and we should have lovely summer weather but as I'm sure most of you have realised the weather isn't exactly matching the season. When it gets cold, wet and windy all I crave is home cooked comfort food and chicken, leek and bacon pie fits the bill perfectly in this case. When it comes to pies I think most of the time you can get away with using ready made pastry as it's just as good as home made stuff. Of course if you wanted to make special pastry like cheese pastry then i'm all for making it from scratch but in times like this then its the shop bought stuff for me. I found this recipe in Cook in Boots which has a whole chapter on comfort food which is amazing and perfect for this weather. I served the pie with some sweet potato mash and all together it was a hug on a plate that was much needed. Below is the original recipe but I added some bacon in with the chicken because everything is better with bacon.

Cock-a-leekie Pie
Serves 6

8 chicken thighs, skinned, boned and chopped into bite-sized chunks
salt and pepper
1 large knob of butter
2 leeks, trimmed and chopped into thick chunks
250g chestnut mushrooms, halved
leaves stripped from 4 bushy sprigs of thyme
zest and juice of 1 lemon
2 tbsp plain flour
1 glass white wine
200ml double cream
3 tbsp flat leaf parsley
375g ready made puff pastry


Preheat oven to 200°c/gas 6. Season the chicken and fry in the butter until sealed on all sides and it has some colour on it. Add the leeks, mushrooms, thyme and lemon zest. Once the mushrooms are nutty and brown, sprinkle in the flour and keep stirring for a minute, then pour in the wine. When the wine has nearly evaporated, pour in the cream and lemon juice, mix and simmer for 5 minutes. Stir in the parsley and put in the bottom of a large pie dish. Leave to cool.
Roll out the pastry on a lightly floured surface until 1cm thick and drape over the pie dish. Cut away the excess pastry and go around the edge with a fork pressing it down. Brush with beaten egg or milk and bake in the oven for 25 minutes. Serve with mash and enjoy.


My First Culinary Creation

Looking back on my posts I have realised that all of them involve recipes from other chefs or people so I wanted to try out one of my own creations. I love unusual flavour combinations and trying out new things so when I discovered a white chocolate and cardamon mousse which tasted fantastic, I immediately wanted to try making some cupcakes in the same flavour. I looked about on the internet for some white chocolate cupcake recipes but they are a little hard to come by. I eventually did some mashing together of different recipes to ensure I had the right components in, especially milk so that i could infuse the cardamon with it. I also wanted to try out a new kind of icing that I discovered and I'm really glad I did. It is the most amazing icing I have ever had and is definitely worth the effort. Its called Italian meringue butter-cream and you can find the recipe on thepinkwhisk which is a blog by one of the runners up in the first Great British Bake Off (best program ever?) I'm glad to say the cakes turned out nicely and so did the icing though it was a little runny to start with, I just added some extra butter and 70g of melted white chocolate and it stiffened up to perfection. I have yet to get feedback from people at work but the boyfriend says they are my best cakes ever (he says that about all my cakes though because he is lovely.)


White Chocolate & Cardamon Cupcakes

100g butter, softened
170g caster sugar
2 eggs
200g plain flour
1tsp baking powder
125ml milk
8 plump cardamon pods (green cardamon)
100g white chocolate


  • Preheat the oven to gas mark 3/160°c. 
  • Take your butter and sugar and beat together until pale and fluffy then add in your eggs and mix until combined. 
  • Put the milk and cardamon in to a saucepan and gently heat through until it simmers and the milk has taken on the flavour of the cardamon. 
  • Whilst doing this put your chocolate in a Bain-marie or a bowl over a saucepan of water (make sure the water isnt touching the bottom of the bowl or the chocolate will burn.) Heat until the chocolate is half melted and then take off the heat and keep stirring. The residual heat will finish melting it. 
  • Strain the milk through a sieve in to the melted chocolate and stir together but make sure the milk isn't boiling or the chocolate will burn. 
  • Once this is done combine a third of the flour with the egg mix and then add a third of the chocolate milk once mixed in. Repeat this until everything is fully combined. 
  • Fill your cupcake cases 2/3 full and put in the oven for 20 to 25 minutes or until golden brown. Once cool, top with your choice of icing. 

Wednesday, 24 August 2011

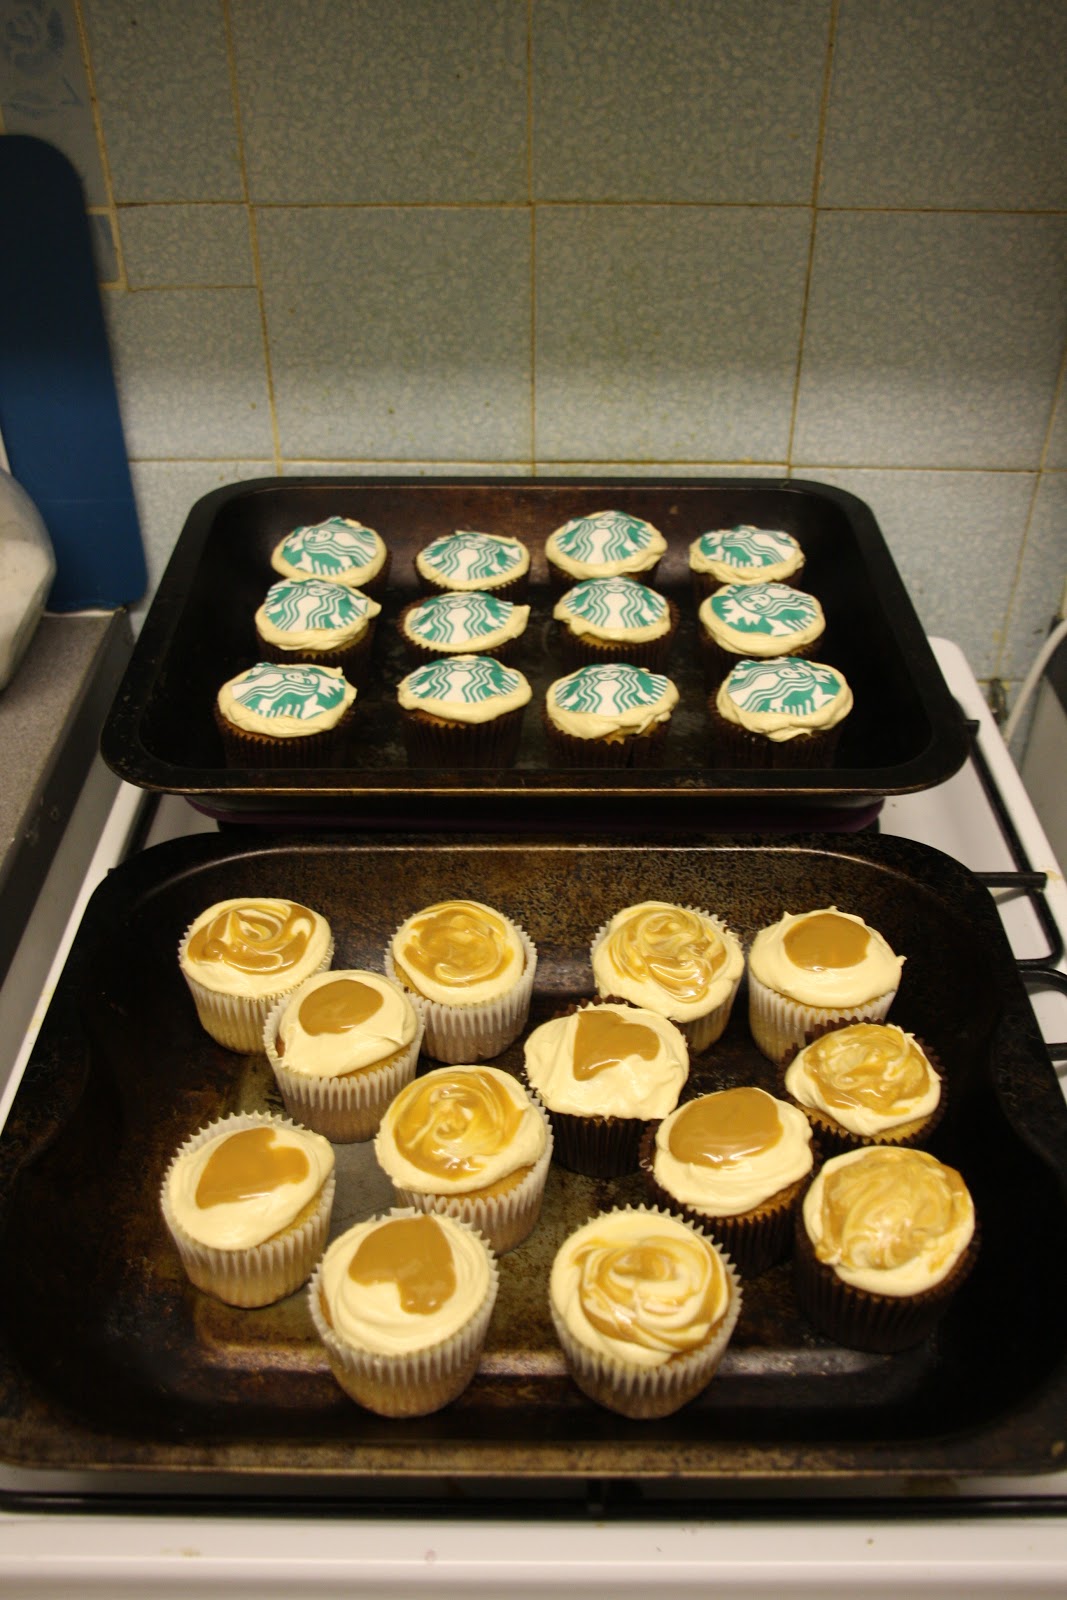
Happy Birthday Next Starbucks!

On the 13th August it was my store's first birthday and to celebrate my boss asked me to make some cupcakes. She had ordered some edible cake toppers from top your cake with the Starbucks logo, for me to put on top of them and let me have creative freedom on the flavour. To suit every one's tastes I went with a pretty neutral flavour of caramel cupcakes as who doesn't like caramelised sugar? I have a lovely recipe by the hummingbird bakery which I have used before for my boyfriends birthday cakes. They went down really well the first time so I chose to redo the recipe which is always a good sign for me. The only difficult ingredient is the tinned caramel but most big supermarkets do it even if your small local shop won't. A great bake for something special or even just for a Saturday afternoon baking.


Hummingbird Bakery Caramel Cupcakes


For the Sponge:

280g caster sugar

80g unsalted butter softened 
240g plain flour
1 tbsp baking powder
1/4 tsp salt
240ml whole milk
1/2 tsp vanilla essence
2 large eggs
150g tinned caramel or dulce de leche


For the Frosting:

500g icing sugar
160g unsulted butter
50ml whole milk
100g tinned caramel or dulce de lech plus extra to decorate


I find this recipe a little backwards as i'm so used to beating the butter and sugar, then the eggs and then adding the dry ingredients carefully but it does work!

1.  Preheat the oven to 190 C (375 F). Gas mark 5 and line a muffin tin with muffin cases
2.  Using a hand-held electric whisk or a freestanding electric mixer with the paddle attachment, whisk together the butter, sugar , flour, baking power and salt on a low speed until crumb-like in consistency.
3.  Place the milk and vanilla essence in a jug with the eggs and whisk by hand until combined.  Pour three quarters of this mixture into the dry ingredients and mix together on a slow speed, then increase the speed to medium and keep beating until smooth and thick.  Scrape down sides of the bowl, then add the remaining milk mixture and the tinned caramel and continue to mix until all the ingredients are incorporated and the batter is smooth.
4.  Divide the batter between the muffin cases, filling each by two-thirds.  Any remaining batter can be used to fill one to four more cases in a separate tin (there will be loads left over).  Place in the oven and bake for 18-20 minutes or until well risen and springy to touch.  Leave to cool for a while in the tin, then transfer to a wire rack to cool down fully while you make the frosting.
5.  Using the electric whisk or freestanding mixer with the paddle attachment, beat the icing sugar with the butter on a low speed until combined and still powdery in texture.  Slowly mix in the milk, and once it is incorporated, increase the speed to high and whisk until light and fluffy.  Add the caramel and beat in well.
6.  Spoon the frosting on to the cupcakes once they have cooled, smoothing it on with a palette knife and swirling the frosting.  If you want to decorate the cakes, spoon some tinned caramel or dulce de leche into a piping bag with a small nozzle and pipe on to the cakes in little hearts, or whatever shape takes your fancy.

Monday, 22 August 2011

Sweet Sundays

For the last few weeks my friend and partner in crime from work have been meeting up every Sunday to bake some delicious creations. It started off with him wanting to try out a recipe for sweet potato pie which he had in America and fell in love with. It was always something on the foodie list so I said we should give it a try and my god am I glad we did. It sounds a little weird but it goes on the same principle as using carrots to make cake, sweet vegetables do work in dessert. We used ready made shortcrust pastry to save on time and effort and in fact it worked out really well. I was worried that the savoury pastry would not go with the sweet filling but it actually balanced the pie out nicely and any sweet pastry would be too much. We found the recipe here and it is so easy to follow. What you end up with is a pie with similar taste to an egg custard tart but with the lovely added flavour of the sweet potatoes. Really good little pudding which can be whipped up in a hurry or really nice if you are craving a little Christmas cheer, even if it is August.

Saturday, 13 August 2011

Epic Meal Time


So since I'm a total food slut, when I discovered the youtube videos by epicmealtime I obviously fell in love with them instantly. Most of their meals include the staples; meat, cheese and bacon. A lot of bacon. Upon watching many a meaty video, my friends and I were inspired to create an epicmealtime of our own. We took our inspiration from the Meatball Deathstar but in the end it was more like a meatloaf of joy. There isn't much of a recipe list as the basic ingredients are simple. This is more of a guide and hopefully inspiration for other people to create bacon and cheese filled meat dishes.

Epic Meal Time

1kg beef mince
500g grated cheese
1 egg
Salt & pepper
1 packet of Tortellini
1 jar tomato pasta sauce
1 packet of garlic bread

Start by putting the mince, most of the cheese (hold some back to make a couple layers in the meatloaf), egg and any herbs you choose. I went with oregano. Mix up together and then add some seasoning. Put a layer of the meat mixture in the bottom of a loaf tin or big ovenproof dish. Cover the sides too. Then put a layer of cheese down. As you're doing this, you should have the pasta boiling and cook for about 4 mins. Add this next once you've drained the water. Next put a final layer of cheese and the rest of the mince to enclose your little cheesy meat package. We magically had the right amount of everything, hopefully you will have the same kind of luck. Bake in a moderate (190°c/gas mark 5) for about 45 mins or until firm to touch. Turn it out in to a serving dish and pour the heated tomato sauce over the top. Serve with the cooked garlic bread and enjoy!


We also made some candy bacon but were a little overzealous with the heat in the oven so most of it burnt. The bits we rescued were absolutely delicious and I would recommend any one who likes bacon and sugar to try it! Just put some streaky bacon on a tinfoil covered tray and sprinkle with soft brown sugar (it must be dark sugar!) Put in a medium oven (190°c/gas mark 6) until nice a crispy but not black like us! 

Wednesday, 10 August 2011

Margarita Cupcakes

I stumbled across a dream of a food blog the other day which has filled me with envy and a whole new list of things I want to try. I still had an excess of Mexican ingredients including a lot of limes and a tiny splash of tequila that somehow got missed so when I spotted a recipe for margarita cupcakes I just had to try them. The recipe from the amazing food blog is here but sadly the measurements are in the American system so I had to do a little conversion of all the ingredients. Luckily for you I wrote these measurements down and will now share them with you. This recipe makes really lovely cakes and I've been told by the boss and chums at work that they are my best lot yet.

Margarita Cupcakes
Margarita Cupcakes:
makes 12-16

110g softened butter
225g caster sugar
2 eggs
2 limes, grated zest and juice
1/4 tsp vanilla extract
4 fl oz buttermilk
225g self-raising flour (I think you're meant to use plain but self raising gives more air in your cakes)
1 1/2 tsp baking powder
1/4 tsp salt
1 tbsp tequila, for brushing the tops of the cakes

The recipe tells you to mix the batter in a different way to how I did mine. Its just the way I know best and means you can get a lot of air in the eggs before adding the dry ingredients.

  1. Preheat oven to gas mark 3/160°C
  2. Beat together the butter and sugar until pale and fluffy then add the eggs and continue to mix on medium speed so that you get some air in to them. After doing so add the lime zest and juice and the vanilla. Give it a little mix but don't worry if it separates, it will all come together.
  3. Mix the dry ingredients in a bowl and then slowly fold in a third to the egg mix. Next add a third of the butter milk. Continue like this until both have been added fully and it has just come together. You don't want to over mix the flour or beat out the air. 
  4. Divide in top cupcake cases and fill about 1/2 or 3/4 full. You don't want them to over flow during baking as mine did.
  5. Bake for 20/22 minutes until firm to touch and a skewer comes out clean. Don't be alarmed if they are quite pale on top, mine were like that too. Just ensure they are cooked through. Let them cool on a wire rack but while they are still warm brush the tops with the tequila.

Tequila-lime Frosting

225g butter
375g icing sugar
1 1/2 tbsp lime
1 tbsp tequila 
pinch of salt

Mix the butter and sugar with an electric whisk for about 5 minutes to get it really light and fluffy (I've never actually taken the time to do this apart from for this recipe and it really makes a difference! The icing came out amazingly!) Once this is done add the lime, tequila and salt. Give it a taste and add more tequila if you think its needed.

Once the cupcakes have cooled either spread the icing on top or use a piping bag. Garnish with a little grated lime zest.

Tuesday, 9 August 2011

Yes you MexiCAN

I've decided to distract myself from the news with my food blog as I'm just getting too angry at what is going on in London at the moment. Last week was definitely Mexican week for me as pretty much every meal had a Mexican theme to it. I even hosted a Mexican evening with friends from work which was meant to involve lots of food and drink but ended up with more of the latter. I did manage to make some Quesadillas and nachos in between blending up batches of makeshift margaritas but of course the idea of taking photos of them didn't pop in to my head at the time. However I did have extra of the ingredients left over then next day so when it came to finding a hangover cure I decided to remake the quesadillas and hoped they would do the trick. And that they did! Those lovely toasty cheese filled pockets are perfect for when you're feeling a little low and need a pick me up. They are also perfect for using up things in your fridge as you really can put anything you like in them! I'm going to put a very basic recipe here but really it can be changed to whatever ingredients you choose. All you need is the tortillas and some cheese and then the world is your oyster.

Quesadilla:
Makes lunch for 2 or 1 hungry person

2 tortilla wraps
Half a red pepper cut in to little pieces
Some finely sliced spring onions
Some freshly chopped coriander
Fresh chopped chili to taste
Lots of lovely grated cheese, whichever is your favourite (cheddar and red Leicester are good, try mexicana cheese too)
Any meat of your choosing, I had some roast chicken in the fridge so used that but you could use anything or nothing!

The best way to do this is mix all your ingredients, except the tortillas of course, in a bowl and then pile them on top of the first tortilla to create a nice layer and then top off with the other tortilla. I chose to put the first tortilla in the pan already and then top it so that I didn't have to try and move the quesadilla once assembled. Then all you need to do is put the lovely little parcel in a pan over a medium heat. You want the cheese to melt so that it gets stuck together inside but also for the tortilla to brown and crisp up on the outside. Once the tortilla reaches a nice golden colour on the first side, you need to be skillful and flip it without all the filling falling out. Cook the same way on the second side and once all the cheese has melted and you have a nice crispy quesadilla, remove from the pan on to a chopping board. Cut in to quarters that you can pick up with your hands and eat easily. Serve with a little sour cream, salsa or guacamole. Whatever takes your fancy!